I've been gone... :/ sorry! Well the 15th is around the corner. I've been working on the craft room and I just wanted to update where I'm at in spending:
TOTAL BUDGET €150
PURCHASED ITEMS
-Table €39,99
-Shelf €14,00
-Pencil/pen storage €12,99
TOTAL SPENT €66,98
I still have €83 remaining!
Will post pictures as soon as the room is done. Just wanted to keep you posted! Still need to get a chair. :/
Thursday, October 13, 2011
Saturday, September 24, 2011
It's a Design Star kinda night
SO ... It's late and I'm up watching Season 6 of Design Star. The creative wheels are spinning.
Recently I've decided to bite the bullet and turn my guest room into a multi-purpose craft/guest room. With the holidays nipping on our heels, I can't have fabric and thread strewn about my dining room during thanksgiving dinner! I put on Design Star and decided to give myself a little budget challenge. (Husband approved)
The Challenge: A multipurpose craft/guest room for €150 ($200) or less
The Contender: Me, a jobless American living in Sicily with a limited access to affordable furniture.
The Start date: Oct 15 (payday)
I've started to clean out the guest room. I already have a somewhat furnished guest room, extremely meager, but furnished. I have a twin bed & a woven rug--- I said meager! Pathetic. I went through some of the tote boxes of clothes and there might be a garage sale in the near future.

Time to poke around the internet for some ideas.
LOVE the pennant window treatment! I've been a little too into pennants lately. Also, check out the embroidery hoops as wall art! Super cute.

I see that they also used a table for a desk.. I will be adopting that idea. A friend of mine uses a simple table from the VIKA line at Ikea. I was concerned with the sturdiness of the table. I attempted to put my sewing machine on a folding table, that, my friends was a mistake! The table hopped up and down when the machine was working. My friend loves hers. SOLD. And at €30 it comes in within my budget.
I'm not a huge fan of the legs... simple. Make a curtain. Plus the curtain will hide any unsightly storage boxes I might have, as well as cords from laptops, hot glue gun, and my sewing machine. I do believe that the legs screw right into the bottom of the table top so there is no ledge to attach a rod for a curtain--- velcro might come in handy. Now I just have to find the right fabric. I'm leaning towards canvas, its neutral and won't clash with my Pottery Barn bedding (on sale, thank you!).
 This is a great idea for storing pens, scissors, brushes & all of those items you need in arms length. Ikea to the rescue yet again.

I can get the rail & 3 little tin baskets for €14 euro. (This brings our current total to €44). For even more storage for rulers and measuring tapes I can repurpose a RIBBA picture ledge (€5)-- i could even put a magnetic strip (€7), you know for holding knives, underneath it and get some baby food jars to hold things like pins, safety pins, needles, etc. Attach a small magnet to the top of the baby food jars and then it will just "hang" from under the ledge.


Time to look at shelves... Don't judge my drawing lol. It's pretty sad.. my no-thumb cat is even unimpressed. I found these bracket mounted wall shelves for €3,50 and the brackets for €3. (2 sets = €19, bringing our current total to €75)
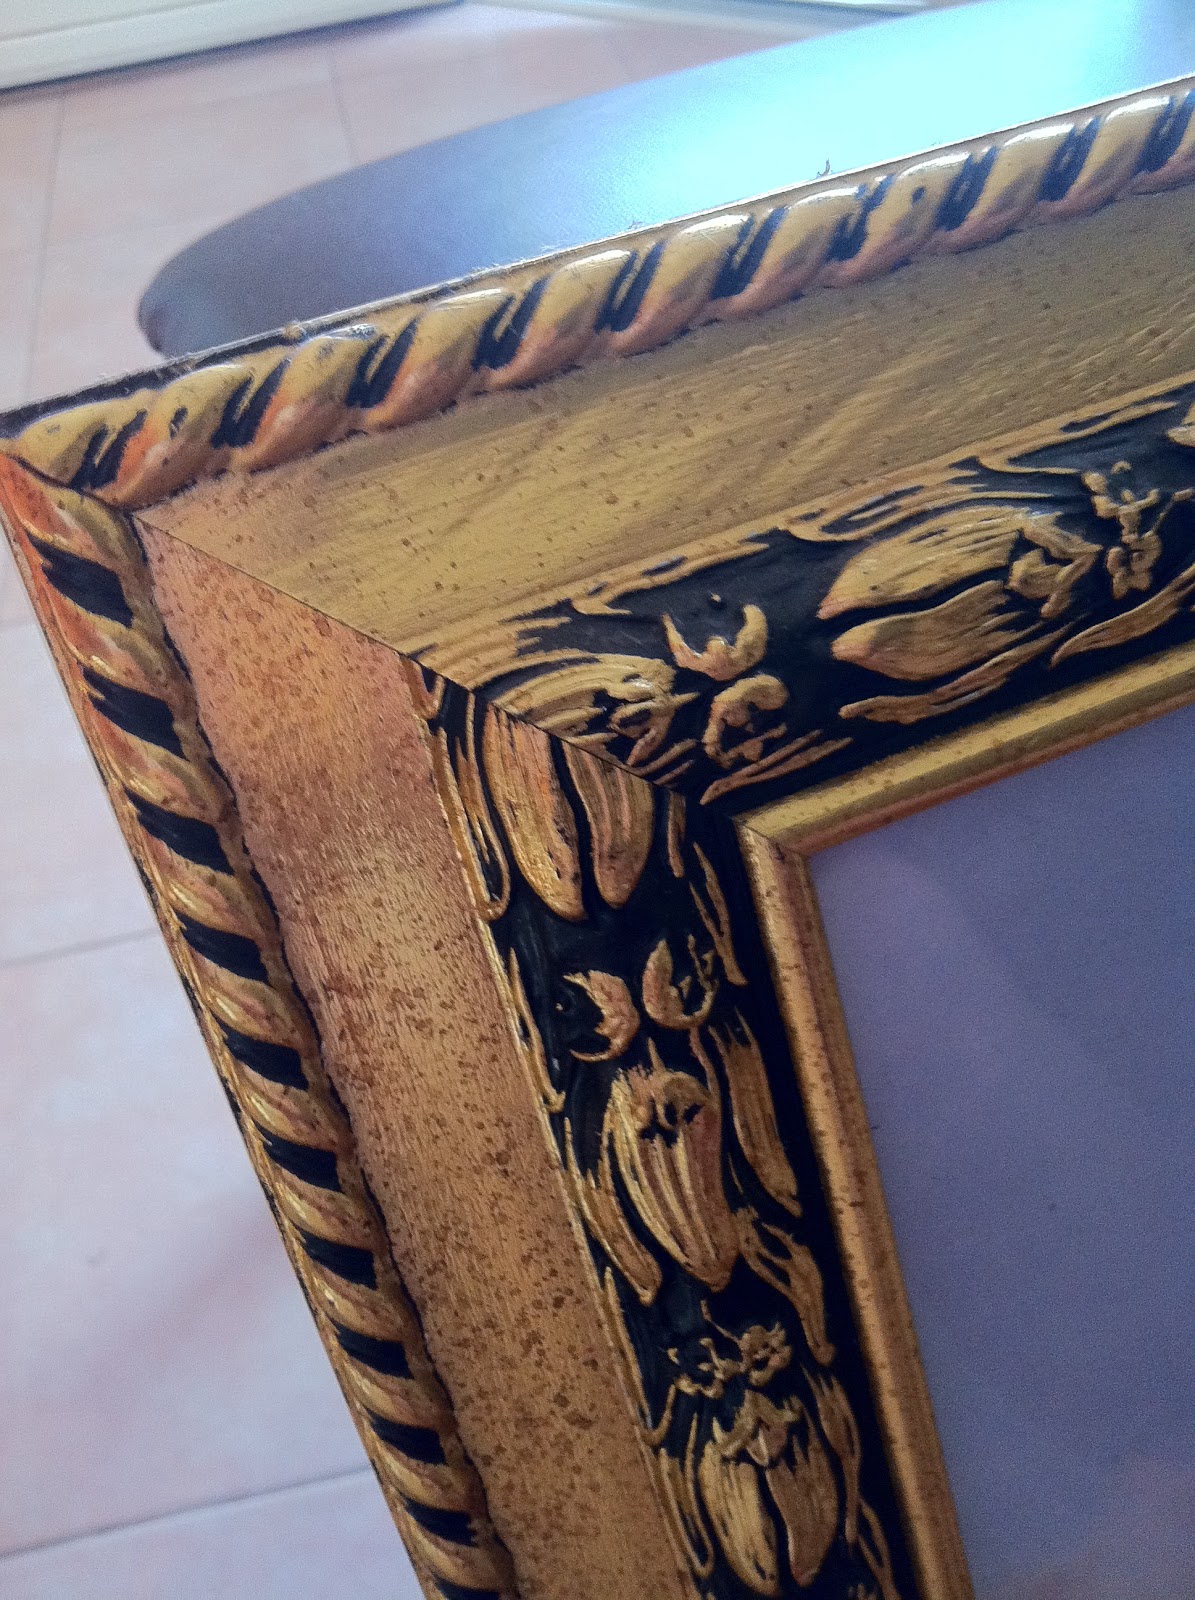
That sorry looking frame is another project entirely. I'm creating a burlap memo board. So far, I've only painted the frame. Here is your sneak peak.


I have a couple more things to tackle:
Window treatment
Storage units to go on the shelves
Step stool cause I'm short
Chair
Curtain for under the table
Utility cart
Relocate the bed so that it is a usable "daybed"
I've got my work cut out for me! But for now... BED!
LOVE the pennant window treatment! I've been a little too into pennants lately. Also, check out the embroidery hoops as wall art! Super cute.

I see that they also used a table for a desk.. I will be adopting that idea. A friend of mine uses a simple table from the VIKA line at Ikea. I was concerned with the sturdiness of the table. I attempted to put my sewing machine on a folding table, that, my friends was a mistake! The table hopped up and down when the machine was working. My friend loves hers. SOLD. And at €30 it comes in within my budget.
I'm not a huge fan of the legs... simple. Make a curtain. Plus the curtain will hide any unsightly storage boxes I might have, as well as cords from laptops, hot glue gun, and my sewing machine. I do believe that the legs screw right into the bottom of the table top so there is no ledge to attach a rod for a curtain--- velcro might come in handy. Now I just have to find the right fabric. I'm leaning towards canvas, its neutral and won't clash with my Pottery Barn bedding (on sale, thank you!).

I can get the rail & 3 little tin baskets for €14 euro. (This brings our current total to €44). For even more storage for rulers and measuring tapes I can repurpose a RIBBA picture ledge (€5)-- i could even put a magnetic strip (€7), you know for holding knives, underneath it and get some baby food jars to hold things like pins, safety pins, needles, etc. Attach a small magnet to the top of the baby food jars and then it will just "hang" from under the ledge.

Everything will be visible. Awe.. they are kinda cute huh? It might be time to try that carrot cake recipe that uses carrot baby food.

Time to look at shelves... Don't judge my drawing lol. It's pretty sad.. my no-thumb cat is even unimpressed. I found these bracket mounted wall shelves for €3,50 and the brackets for €3. (2 sets = €19, bringing our current total to €75)
That sorry looking frame is another project entirely. I'm creating a burlap memo board. So far, I've only painted the frame. Here is your sneak peak.

Window treatment
Storage units to go on the shelves
Step stool cause I'm short
Chair
Curtain for under the table
Utility cart
Relocate the bed so that it is a usable "daybed"
I've got my work cut out for me! But for now... BED!
Sunday, September 18, 2011
I'm Goin' Batty!
The other day I posted a picture of one of my bat pillows. I fell in love with them when I saw them at HGTV.com I still had another to make so I tried to take pictures along the way. I apologize, its not the best but I gave it a fair shot! These came out SO cute.


Now you can print the templates if you want but I just traced it from my computer screen. I know, lazy! :) But I don't have a printer.
 First thing is to cut out your bats from the black felt. Pin the stencils in place and use sharp scissors. Mine aren't great.. I need new ones.
You can cut out as many bats as you want for the pillow, I chose 3.

Cut out 1 19"x19" square of the cream felt. Why 19"x19" when the pillow is 20"x20"? Because when you put the pillow form inside the case, it will fit a little snug, this makes the pillow more full. If you were to make 20"x20" cases, there would be some gaps in the fabric and it would make it look a little saggy.
Take your bats and map them out. Then, using fabric glue, tack down the body of the bat and the wing tips so that the bats look like they are flying off of the pillow.

 This next part is optional, I did it. Just put on a couple episodes of your favorite tv show (in my case it was The Munsters season 1). Take some black embroidery thread and sew down the body and the wing tips. This doesn't have to be done with fancy-shmancy technique.
Cut out a 20"x20" square in the black felt. Lay the square with the bats on them on top of the black felt so that the black creates a "frame" around it, see picture, pin it down.
Depending on if you want to just store these pillows in their entirety or just make cases this part might differ. I made mine in an envelope style so that I can slip the pillow form right inside the case.
 If you want to just make the cases then you're going to cut a 21"x21" square of cream felt. Cut it down the middle to make 2 rectangles. Flip the pinned black and cream felt over to the back side, black felt side up. Lay the 2 cream rectangles so that they form 19"x19" across and overlap by 2" in the middle, pin this down through the black felt to the cream with the bats on it.
 Run all 3 layers through your sewing machine. I am using a cream colored thread. Sew around the outside edges of the cream fabric, about a half inch from the edge. When you reach the corners, leave the needle in the fabric, lift the presser foot and rotate the fabric. This will help with a clean corner instead of a rounded one.

Sewing the edges together shouldn't take you more than a couple minutes. Once your done, trim up the thread and slip your pillow form in!
**Now if you are wanting to leave this case ON the pillow and just store it away for next year: then cut 2 19"x19" squares from the cream fabric and slip the pillow in before you close up the pillow.
When it comes time to put these bats back in the cave, just crumple up some tissue paper and tuck it under the wings. This will prevent the wings from smashing down.


What you will need:
1 yard each of
-Black Felt
-Cream Felt
20x20 pillow forms
Black embroidery thread
Embroidery needle
Fabric Glue
Sewing Machine
Cream colored thread
Sewing Machine
Cream colored thread
Now you can print the templates if you want but I just traced it from my computer screen. I know, lazy! :) But I don't have a printer.
 First thing is to cut out your bats from the black felt. Pin the stencils in place and use sharp scissors. Mine aren't great.. I need new ones.
You can cut out as many bats as you want for the pillow, I chose 3.

Cut out 1 19"x19" square of the cream felt. Why 19"x19" when the pillow is 20"x20"? Because when you put the pillow form inside the case, it will fit a little snug, this makes the pillow more full. If you were to make 20"x20" cases, there would be some gaps in the fabric and it would make it look a little saggy.
Take your bats and map them out. Then, using fabric glue, tack down the body of the bat and the wing tips so that the bats look like they are flying off of the pillow.

 This next part is optional, I did it. Just put on a couple episodes of your favorite tv show (in my case it was The Munsters season 1). Take some black embroidery thread and sew down the body and the wing tips. This doesn't have to be done with fancy-shmancy technique.
 Cut out a 20"x20" square in the black felt. Lay the square with the bats on them on top of the black felt so that the black creates a "frame" around it, see picture, pin it down.
Depending on if you want to just store these pillows in their entirety or just make cases this part might differ. I made mine in an envelope style so that I can slip the pillow form right inside the case.
 If you want to just make the cases then you're going to cut a 21"x21" square of cream felt. Cut it down the middle to make 2 rectangles. Flip the pinned black and cream felt over to the back side, black felt side up. Lay the 2 cream rectangles so that they form 19"x19" across and overlap by 2" in the middle, pin this down through the black felt to the cream with the bats on it.

Sewing the edges together shouldn't take you more than a couple minutes. Once your done, trim up the thread and slip your pillow form in!
**Now if you are wanting to leave this case ON the pillow and just store it away for next year: then cut 2 19"x19" squares from the cream fabric and slip the pillow in before you close up the pillow.
When it comes time to put these bats back in the cave, just crumple up some tissue paper and tuck it under the wings. This will prevent the wings from smashing down.
Speaking of going batty.. OMG Scentsy fans...


I'm doing a Scentsy party on Oct 2nd if anyone is interested! They have some great fall/winter scents to help your holiday smell fantastic.
Thursday, September 15, 2011
Pre Halloween Decorations & a little bit of slackin'
Hey everyone...
I've been slacking a little. It's been really hot out and that makes me lazy lol.

 I am happy to say that it is finally fall and the weather is cooling down. I've got a bunch of projects in my radar right now. I am going to be throwing my first ever (yes-- EVER) Halloween party. I know, I'm 26 and never had my own Halloween Party. As a kid we never really celebrated Halloween. There are only a handful of times I even remember trick-or-treating around the neighborhood.
I've started to decorate the living room. If I start now I have a whole month before Halloween! Giggity!!
I recently went to a friend's Party lite party. I LOVED all the cute Halloween decorations but I just can't bring myself to spend all that money on something I'm just gonna burn. I did, however, buy some of the decorations. In the first picture you can see the Momma cat and her kitten tea light set. SO cute on my coffee table.
 I fell in love with their 5" pillar candle that looks like candy corn. My favorite Halloween candy is candy corn.. I can set aside all knowledge of the upset stomach that comes after eating a handful. But at $18 for one candle, thats a stomach ache right there! I don't plan on burning this candle so I figured what do I care what it smells like anyway. I knew I could replicate this... and just like that I'm on the hunt.
I went to my favorite place, yep you know it.... IKEA. Ever strolled into the sale section? It's like a treasure trove! Cabinet doors, "broken" goods, fabric remnants... "damaged" candles. I got 2 candles for €1,50 each. They were a little dirty but I'm gonna fix that anyway and no one is gonna see it. Beats paying €2,99!

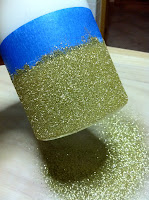
 Earlier this week I went into the fabric district with some girl friends and I was lucky enough to find a store that sold glitter. SCORE! I got gold, orange and white for €2 each.

I measured the candles and marked it in thirds. Took some painters tape and taped off the bottom third. This project is gonna take me some time! Good thing I've got the entire first seasons of Bewitched and Munsters! I hope this works out and gives me a decently clean edge.
Place some wax paper/parchment paper/or a flexible craft mat underneath where you are working in order to catch the left over glitter.
Next, squeeze some elmers glue around the bottom third and spread it around with your fingers. It's a sticky job! Then take your glitter, in this case its the bottom color layer of the candy corn. Don't worry about excess as it will just end up on the paper and you can funnel it back into the container. This way you can reuse the glitter. Let this dry! I don't know for how long but I'm giving it at LEAST an hour (thats about 3 episodes of Munsters).
I haven't started the other layers yet but I will post those when I do.


Partylite Candy Corn Candles $18 x2 = $36 +shipping
My Candle project (after € to $ conversion)
Candles: $4
Glitter : $8.30
Glue & tape: already had it
TOTAL: $12.30
yeah.. how about them apples?
Here are some other things I've done to start preparing for Halloween:
Felt bat pillow

Isn't he cute?! I've got one more to make so keep your eyes peeled for the post on that.

Drippy blood candles
Will DEFINITELY make more of these!
So excited for Halloween! :)
I've been slacking a little. It's been really hot out and that makes me lazy lol.

 I am happy to say that it is finally fall and the weather is cooling down. I've got a bunch of projects in my radar right now. I am going to be throwing my first ever (yes-- EVER) Halloween party. I know, I'm 26 and never had my own Halloween Party. As a kid we never really celebrated Halloween. There are only a handful of times I even remember trick-or-treating around the neighborhood.
I've started to decorate the living room. If I start now I have a whole month before Halloween! Giggity!!
I recently went to a friend's Party lite party. I LOVED all the cute Halloween decorations but I just can't bring myself to spend all that money on something I'm just gonna burn. I did, however, buy some of the decorations. In the first picture you can see the Momma cat and her kitten tea light set. SO cute on my coffee table.
 I fell in love with their 5" pillar candle that looks like candy corn. My favorite Halloween candy is candy corn.. I can set aside all knowledge of the upset stomach that comes after eating a handful. But at $18 for one candle, thats a stomach ache right there! I don't plan on burning this candle so I figured what do I care what it smells like anyway. I knew I could replicate this... and just like that I'm on the hunt.
I went to my favorite place, yep you know it.... IKEA. Ever strolled into the sale section? It's like a treasure trove! Cabinet doors, "broken" goods, fabric remnants... "damaged" candles. I got 2 candles for €1,50 each. They were a little dirty but I'm gonna fix that anyway and no one is gonna see it. Beats paying €2,99!

 Earlier this week I went into the fabric district with some girl friends and I was lucky enough to find a store that sold glitter. SCORE! I got gold, orange and white for €2 each.
I measured the candles and marked it in thirds. Took some painters tape and taped off the bottom third. This project is gonna take me some time! Good thing I've got the entire first seasons of Bewitched and Munsters! I hope this works out and gives me a decently clean edge.
Place some wax paper/parchment paper/or a flexible craft mat underneath where you are working in order to catch the left over glitter.
Next, squeeze some elmers glue around the bottom third and spread it around with your fingers. It's a sticky job! Then take your glitter, in this case its the bottom color layer of the candy corn. Don't worry about excess as it will just end up on the paper and you can funnel it back into the container. This way you can reuse the glitter. Let this dry! I don't know for how long but I'm giving it at LEAST an hour (thats about 3 episodes of Munsters).
I haven't started the other layers yet but I will post those when I do.
**EDIT**
added the 2nd layer of orange.. giggity!!
they aren't perfect but they are handmade and one of a kind.
they aren't perfect but they are handmade and one of a kind.

**RE- EDIT**
Finished the last layer and they are up in the candle holders now!

Partylite Candy Corn Candles $18 x2 = $36 +shipping
My Candle project (after € to $ conversion)
Candles: $4
Glitter : $8.30
Glue & tape: already had it
TOTAL: $12.30
yeah.. how about them apples?
Here are some other things I've done to start preparing for Halloween:
Felt bat pillow

Isn't he cute?! I've got one more to make so keep your eyes peeled for the post on that.

Drippy blood candles
Will DEFINITELY make more of these!
So excited for Halloween! :)
Sunday, August 28, 2011
No round of a-paws needed
Ok cheesy title... so sue me!

 If you're a pet owner with no kids then your pets turn into your kids.. am I right? Fur babies. They are so spoiled and they totally know it. It's sad when you're parents ask you how their grand-cats are.
Since I've been spending so much time making the human parts of the house look nice, the kitties were a little neglected. Time to spoil them some more. We have the cat beds that you can get at pet stores but they get so dirty and covered in hair SO quickly. They aren't attractive when they look like another cat! I was poking around Ikea Hackers, some people that had taken doll beds and other kinds of random ikea pieces and turned them into pet bedding. I found the doll bed at Ikea that I knew I could turn into a one of a kind, special resting spot for my boys.
 The bed came with bedding for a doll, it was pretty thin. I wanted some pretty fluffy stuff for my pretty fluffy cat. I bought a cheap pillow insert at Ikea for a couple euro. The Fjadrar inner (silly swedes) in 16x24. I bought some fabric in the same pattern that I made our throw pillows out of for the couch. It, too, was from Ikea. God! I love this store! The material is Sofia, in case you are wondering.
I made a quick little envelope style pillow case. This way I can remove it and toss it in the laundry. The pillow fits perfectly!
 Our living room has black wood furniture--- this was a job for spray paint! I went down to the local Leroy Merlin (it's like the Italian version of Home Depot or Lowes) and picked up a can of black paint for a couple euro. A couple coats later and it looks like I spent a million dollars at one of those hoity-toity pet boutiques!
 Being that we lost our scratching post in the move.. I also wanted to make the bed double as a scratching post. Our NEX had sisal rope for $1.97.. SCORE! Little bit of hot glue and we are good to go!
Isn't it sweet?!?! We also put some of those furniture stick on pads to the bottom of the posts. This way the bed can move around without screeching.
Captain loves it, Beemer won't go near it-- I figured as much. He's a bit of a drama queen. Once the other cat touches it, he doesn't want anything to do with it. lol.


By a show of paws... who hates their cat bed?

 If you're a pet owner with no kids then your pets turn into your kids.. am I right? Fur babies. They are so spoiled and they totally know it. It's sad when you're parents ask you how their grand-cats are.
Since I've been spending so much time making the human parts of the house look nice, the kitties were a little neglected. Time to spoil them some more. We have the cat beds that you can get at pet stores but they get so dirty and covered in hair SO quickly. They aren't attractive when they look like another cat! I was poking around Ikea Hackers, some people that had taken doll beds and other kinds of random ikea pieces and turned them into pet bedding. I found the doll bed at Ikea that I knew I could turn into a one of a kind, special resting spot for my boys.

I made a quick little envelope style pillow case. This way I can remove it and toss it in the laundry. The pillow fits perfectly!

 Being that we lost our scratching post in the move.. I also wanted to make the bed double as a scratching post. Our NEX had sisal rope for $1.97.. SCORE! Little bit of hot glue and we are good to go!
Isn't it sweet?!?! We also put some of those furniture stick on pads to the bottom of the posts. This way the bed can move around without screeching.
Captain loves it, Beemer won't go near it-- I figured as much. He's a bit of a drama queen. Once the other cat touches it, he doesn't want anything to do with it. lol.

Our resident sleep expert gives it a snooze of approval. :)
5 paw rating!


** EDIT **
I added a vinyl from Uppercase Living

Friday, August 19, 2011
Dinner on the fly... no fly on the dinner!
 I was at a loss when it came to making dinner tonight. I thawed out some boneless skinless chicken, but like a lot of things I've tackled lately, its a blank slate.
Earlier this week, some girlfriends of mine and myself found this middle eastern "fast" food place in downtown Catania. I ordered a chicken tikka wrap, it was pretty darn good! I remembered that and attempted to make it tonight. For a second I was drawing blanks but then I remembered that a couple weeks ago I bought this spice mix in the grocery store. Thank you McCormick!! Luckily I had everything I needed... SCORE! I was so excited that I wanted to share this endeavor with you all. These spice blends are so flippin' sweet. Every spice needed to accomplish the recipe is pre-measured and the recipe card is on the back of the package. GENIUS!
I had already thawed out the chicken. Just needed to juice a lemon, which I actually had on hand!

Chicken Tikka Masala
*according to McCormick, by all means make this if you have the ingredients on hand.2 tsp Paprika
1 tsp Minced Garlic
1 tsp Garam Masala
1/2 tsp Cumin
1/2 tsp Crushed Red Pepper (added for taste- optional)
2 tbsp Butter
 1 1/2 lbs Boneless, skinless chicken breasts cut into cubes
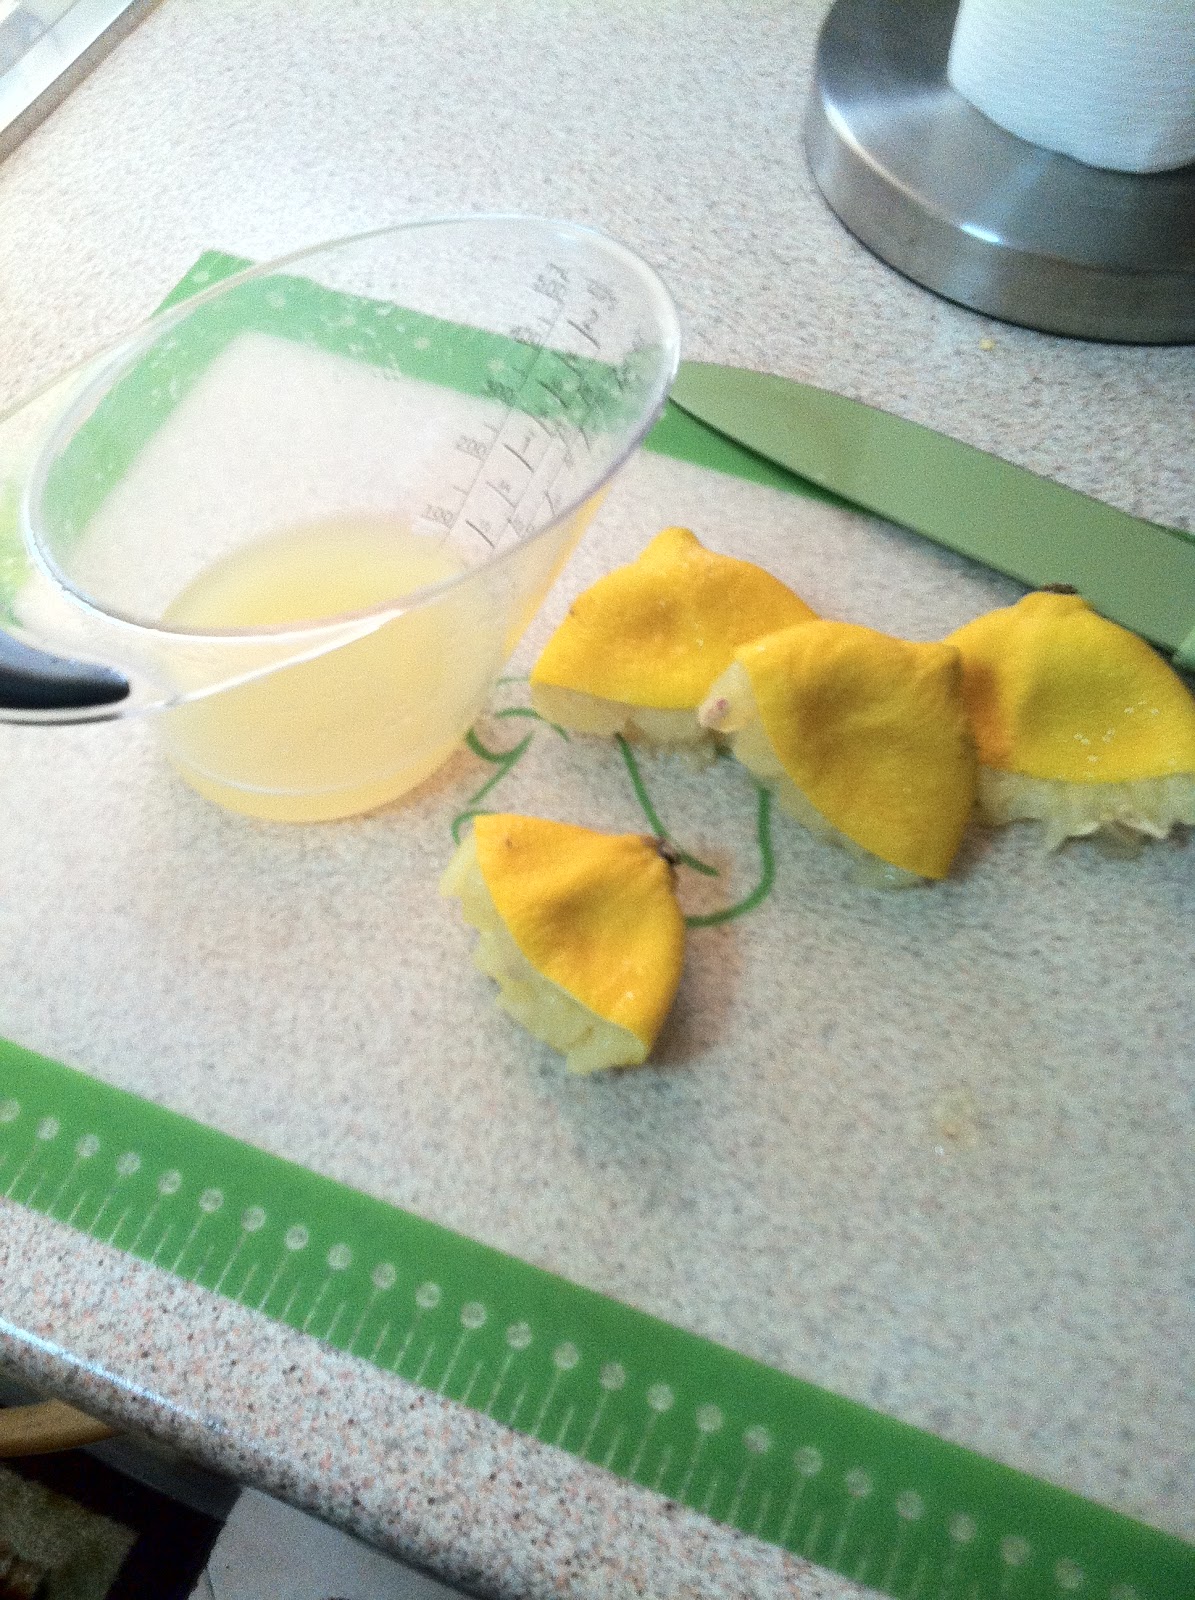 1 medium onion, chopped
2 tbsp lemon juice-- fresh if possible!
1 14oz. can diced tomatoes, undrained
1/3 cup heavy cream
1 tbsp cornstarch
1/2 tsp salt
 1. Melt the butter in a large non-stick skillet on medium heat. Add your chicken, the onion and the lemon juice. Cook the chicken til its no longer pink, about 10 min. Add all the spices, except the red peppers. Cook for about a min.
2. Stir in the tomatoes.
3. Mix the heavy cream with the cornstarch and salt til smooth. Pour into the chicken and stir. Bring to a boil. Reduce heat to low and simmer for about 5 min, constantly stirring.
 4. Serve with rice, naan bread, couscous, or in a wrap like I did with romaine lettuce.
DIY Inspirations --- oui?

I really wanted to start working on my dining room but I'm kind of at a standstill financially with it. I found someone that can duplicate the Pottery Barn buffet for $300. That is a hell of a lot better than $1500!!! The Ikea one would've costed me almost $300 with the conversion from Euro to USD going the way it is now. So, if I can set aside that money, then I will have him make it. Once I can get that project going then I will feel a little better about my dining room. As of right now it looks like a hot mess.

 With thoughts of my dining room simmering on the back burner... I have started on the bedroom. I've been on a bit of a Parisienne kick lately. I found this fabric on ebay ^ & I fell in love, but not for $229 (8.5 yards). I trolled etsy again and found someone selling 2 yards for $45. That I can do, I don't need much. Remember that chair project? Thats the fabric I was thinking of doing the cushion in.
 (<< West Elm)
We have been on the look out for new bedding for a little while now. I came across some white bedding at West Elm for a decent price. I had my eye on it for quite some time and went back and forth on the colors. I finally went to buy it and with my luck it was sold out and on back order til November. UGH! I googled it to see if anyone had anything to say about it. It seemed that the consensus was that it had a low thread count and didn't hold up with washings. I thought "ok, can we make this?"... "si se puede!"
 I stumbled upon another DIY lady with the same mentality and I followed her almost to the T. I found 2 flat white sheets at Ikea for a heck of a lot cheaper.
My changes to the design were:
1) I made the twisted "pleats" on the "wrong side of the fabric" so that I didn't have the fabric nubs hanging on the top of the sheet when I sew it together and flip it right side out.
2)Instead of alternating the pleats... i did every corner of the grid.
(mine >>)
West Elm $119
Shipping $21
TOTAL $140
Ikea €11,50 x 2 = $32
yeah.. I think I win here.
 It is on my bed now but not 100% finished. I am in between making ties to close it or using buttons. I had a duvet that we were gonna toss anyway so I cut the buttons off of it to recycle them... but I might just use charcoal colored satin ribbon and make ties like pictured here.
I hope to start the chair next week.. I have a relay for life event this weekend so I won't be doing much DIY til next week. But I do hear the whispers of a Union Jack pillow -- this might happen this weekend. Dunno where I'm gonna put it but I'm totally gonna make one :).
Subscribe to:
Comments (Atom)